DataGridViewとDataTable
2017/12/05
DataGridViewにDataTableを関連付けて動作を確認します。
◆環境
| OS |
Windows 7 Professional Service Pack 1 |
| C# |
01018-587-4054026-70884 |
以下の手順を行います。
- [ファイル]-[新規作成]-[プロジェクト]を選択します。
- [Visual C#]を選択し、[Windows フォーム アプリケーション]を選択します。
「プロジェクト名」は「DGVandDT」にします。
DataTableをDataGridViewへ関連付けるには、DataGridView.DataSourceにDataTableを指定します。
|
Form1.cs
|
1:
2:
3:
4:
5:
6:
7:
8:
9:
10:
11:
12:
13:
14:
15:
16:
17:
18:
19:
20:
21:
22:
23:
24:
25:
26:
27:
28:
29:
30:
31:
32:
33:
34:
35:
36:
37:
38:
39:
40:
41:
42:
43:
44:
45:
46:
47:
|
using System;
using System.Collections.Generic;
using System.ComponentModel;
using System.Data;
using System.Drawing;
using System.Linq;
using System.Text;
using System.Windows.Forms;
namespace DGVandDT
{
public partial class Form1 : Form
{
public Form1()
{
InitializeComponent();
}
private void Form1_Load( object sender, EventArgs e )
{
DataTable tbl = new DataTable();
tbl.Columns.Add( "col-1", typeof( string ) );
tbl.Columns.Add( "col-2", typeof( string ) );
tbl.Columns.Add( "col-3", typeof( string ) );
// DataGridViewにDataTableを関連付ける
v1.DataSource = tbl;
}
private void button1_Click( object sender, EventArgs e )
{
// DataGridViewから関連付けられているDataTableを
// 取得する
DataTable buf = ( DataTable )v1.DataSource;
if ( buf.Rows.Count > 0 )
{
// 1カラム目の内容を取得
string val
= buf.Rows[0].Field<string>( "col-1" );
// 2カラム目に値を設定
buf.Rows[0].SetField( "col-2", val );
}
}
}
}
|
|
実行すると3カラム追加された状態のデータ・グリッドが表示されます。
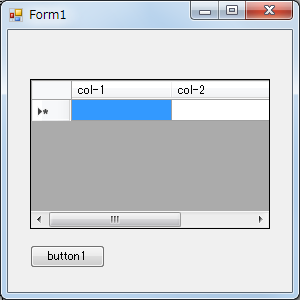
1カラム目に適当に文字を入力しbutton1を押すと、その内容が2カラム目にコピーされます。

▲ PageTop ■ Home
Copyright (C) 2017 - 2019 ymlib.com